|
|
 |
|
|
|
Tips and Tricks of the
Trade |
|
If you are
new to underwater photography, what do you need to get
started? There is a variety of equipment you could use, from a
disposable camera that can operate to 10' underwater to point
and shoot cameras in a waterproof case to a Nikonos (where you
can use several types of lenses and go to 165') to your
regular SLR in a housing (and go to 300'). Bonica,
Sea& Sea, Nikon are just a few of the companies that make
waterproof cameras. You usually get what you pay for;
you will have less flexibility in the choice of lenses,
apertures, strobes and shutter speed choices with the lower
priced systems. If you choose to house your camera, you
will have the most flexibility and control of your camera and
strobes, but at a greater price. O.K., let's say you
have a camera that you can take down while snorkeling or scuba
diving...what are you going to do with it?
|
|
|
|
TIP
#1 |
|
No photograph is
worth doing damage to the underwater flora and fauna, so make
sure you don't touch anything or kick up any silt...not
only will the silt adversely affect your pictures, but
what appears to be bare sand to you is usually the home
of some small critter. Do not chase or harrass any wildlife
and you will find they will actually come to you! You might
want to practice with your camera in a pool. Take
pictures of people, plastic fish, anything you can think of.
Work on your buoyancy skills with the camera in your
hand. You cannot take good pictures if you cannot
control your position in the water. If you are snorkeling, be
very comfortable with being able to hold your breath and stay
still. On the surface, keep your fin kicks under the water for
efficiency . You don't want to scare your subjects. Become one
with the environment. |
|
|
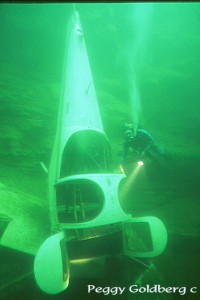
The plane at
100' in 40 Fathom Grotto taken with a Nikonos V/ 15 mm
lens at f2.8 for 10 secs hovering still at
110' |
|
|
|
TIP
#2 |
|
Get close to your
subject! I mean within 3'!!! Make sure you know the minimum
focusing distance for your lens, but work as close as
possible. You are not taking landscape photography! This is
especially important if you use a strobe....and that is a
whole book in itself. I suggest you not use a strobe at first,
and take natural light photography until you get comfortable
with handling the camera. The strobes on the "point and
shoots" and disposables are too close to the lens - underwater
it creates a problem with the backscatter that is caused by
particulate in the water...your photos will look like they
have "snow" in them. |
|
|
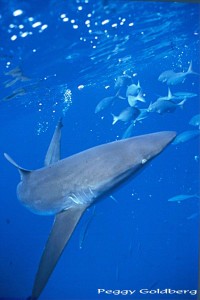
Galapagos Shark
off Cocos Island, Costa Rica taken with a Nikonos V/20 mm lens
at f 11 at 60th sec. (Shark is less than 2' from
lens) |
|
|
|
TIP
#3 |
|
Look up! Ignore
everything you know about land photography - we do shoot into
the sun, with our subject either in the sun glow or with the
sun just above the subject. Do not shoot down to your subject,
it will be flat and uninteresting. And finally, Shoot, Shoot,
Shoot!! Learning underwater photography is a never-ending
learning process. I hope your interest is piqued enough to
give it a try...these tips should help get you started. Any
questions? I'll be glad to help...just e-mail me at:
pgoldberg@goldenimages-photo-scuba.com
|
|
|
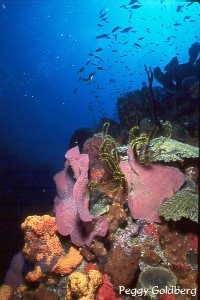
Criniods and Sponges on wall in
Dominica taken with Nikonos V/ 15mmlens at f11 at 60th sec.
(Wall is around 3' away at around
70')
| | |